einszwovier: Kicker Glow-Up
By Aron Petau and Friedrich Weber Goizel • 8 minutes read •
Course Profile
| Course Title | Kicker Glow-Up: Custom Foosball Figurines |
| Duration | 3 days (3 × 120 min or 3 × 180 min) |
| Target Group | 7th grade students (ages 12-13) |
| Group Size | 10-12 students |
| Location | School makerspace / workshop environment |
| Equipment | iPads (provided by GvB), 3D printers, painting supplies |
Skills Trained
- Digital Literacy: 3D scanning with Polycam/Scaniverse, CAD design in TinkerCAD, slicing software (PrusaSlicer)
- Design Thinking: Iterative prototyping, problem-solving, technical constraints (scale, printability, mounting)
- Making Skills: 3D printing fundamentals, post-processing, painting and finishing techniques
- Collaborative Learning: Peer support, shared troubleshooting, collective maintenance
- Spatial Appropriation: Critical reflection on representation in public play spaces, claiming ownership through making
Reimagining Foosball Figurines
The Kicker Glow-Up is now in its second iteration—a hands-on 3-day workshop designed for 7th graders to create their own custom table foosball figurines for the school's outdoor tables. This project combines digital fabrication, 3D modeling, and creativity to give students ownership over their play equipment. The entire workflow runs on iPads provided by the GVB (Gemeinnützige Gesellschaft für berufsbildende Maßnahmen), making digital fabrication accessible without requiring extensive computer infrastructure.
How It Started
The idea for this workshop emerged from a casual conversation with a female student who off-handedly complained that foosball figurines are always male-coded. That observation stopped us in our tracks. She was absolutely right—standard foosball figures implicitly exclude and subtly reinforce who "belongs" in play spaces.
We realized that individualizing the figurines wasn't just a fun making project—it was a perfectly educational way for students to appropriate their own playgrounds. By creating their own representations, students claim ownership over public play equipment and reshape the implicit messages about who these spaces are for.
Workshop Overview
Over three intensive days, students learn the complete digital fabrication pipeline: from capturing 3D scans of themselves or objects, modeling and adapting designs in CAD software, preparing files for 3D printing, to finally manufacturing and finishing their custom figurines.
The workshop empowers students to:
- Digitize the physical world using 3D scanning tools
- Design in 3D with accessible CAD software
- Understand manufacturing through hands-on 3D printing
- Personalize their environment by creating functional art for their school
The Workflow
flowchart TB
    subgraph day1["Day 1: Model Acquisition"]
        Start[Start Workshop] --> Polycam[Scan with Polycam]
        Start --> Scaniverse[Scan with Scaniverse]
        Start --> Online[Download from Thingiverse/Online]
        Start --> Scratch[Build from Scratch]
    end

    subgraph day2["Day 2: Design & Preparation"]
        Design[Design in TinkerCAD]
        Nomad[Optional: Refine in Nomad Sculpt]
        Slice[Prepare in PrusaSlicer]
    end

    subgraph day3["Day 3: Manufacturing & Installation"]
        Print[3D Print Figurine]
        Paint[Paint & Finish]
        Install[Install on Table]
        Play[Play Foosball!]
    end

    Polycam -->|"export model"| Design
    Scaniverse -->|"export model"| Design
    Online -->|"import to TinkerCAD"| Design
    Scratch -->|"create in TinkerCAD"| Design

    Design -->|"if needed"| Nomad
    Design -->|"ready to print"| Slice
    Nomad -->|"final model"| Slice

    Slice --> Print
    Print --> Paint
    Paint --> Install
    Install --> Play

    style Start fill:#006994
    style Start color:#ffffff
    style Polycam fill:#006994
    style Polycam color:#ffffff
    style Scaniverse fill:#006994
    style Scaniverse color:#ffffff
    style Online fill:#006994
    style Online color:#ffffff
    style Scratch fill:#006994
    style Scratch color:#ffffff

    style Design fill:#ff1493
    style Design color:#ffffff
    style Nomad fill:#ff1493
    style Nomad color:#ffffff
    style Slice fill:#ff1493
    style Slice color:#ffffff

    style Print fill:#ffd700
    style Print color:#000000
    style Paint fill:#ffd700
    style Paint color:#000000
    style Install fill:#ffd700
    style Install color:#000000
    style Play fill:#ffd700
    style Play color:#000000
Workshop Structure
The workshop spans three days with flexible timing—either 3 × 120 minutes or 3 × 180 minutes, depending on the school's schedule. Each day builds upon the previous, moving from exploration to creation to celebration.
Day 1: Introduction & Exploration (120-180 min)
The first day establishes the foundation and sparks curiosity:
Space & Machines (30-45 min)
- Room introduction to the makerspace or workshop environment
- Machine introductions: What is a 3D printer? How does it work?
- Exploration of makerspace possibilities beyond 3D printing (laser cutting, electronics, etc.)
- Safety guidelines and responsible making
Software Introduction (30-45 min)
- Basic introduction to TinkerCAD on iPads
- Interface navigation and essential tools
- Understanding 3D space and manipulation
- Demonstration of scan-to-model workflow
Hands-on Exploration (60-90 min)
- Students experiment freely in TinkerCAD
- Individual support and guidance as needed
- First attempts at 3D scanning with Polycam or Scaniverse
- Students begin conceptualizing their figurine designs
The key here is balance—enough structure to feel confident, enough freedom to foster creativity.
Day 2: Design & Production (120-180 min)
Day two is when magic happens—fully student-driven design and manufacturing:
Full Design Phase (90-120 min)
- Students work independently on their figurine models
- Integrating scans or building from scratch in TinkerCAD
- We assist only when asked—ownership is with the students
- Problem-solving and iteration become natural parts of the process
- Ensuring models meet technical requirements (mounting, scale, printability)
Slicing & Printing (30-60 min)
- Students prepare their models in PrusaSlicer
- Learning about supports, orientation, and print settings
- Starting prints for models that are ready
- Understanding print time vs. complexity trade-offs
Overnight Printing
- Models requiring more design time get finished and queued for overnight printing
- Ensures all students have completed pieces by Day 3
By putting students in the driver's seat, they encounter real challenges and develop genuine solutions—far more valuable than following instructions.
Day 3: Finishing & Installation (120-180 min)
The final day transforms digital creations into physical play equipment:
Post-Processing (45-60 min)
- Removing supports from printed figurines
- Sanding and surface preparation
- Quality check and minor repairs if needed
Painting & Decoration (45-60 min)
- Students personalize their figurines with paint
- Protective coatings and finishing touches
- Curing time while preparing for installation
Table Preparation & Installation (30-60 min)
- Collective table maintenance—cleaning, repairing, and oiling the foosball table
- Often surprisingly exciting for students to see behind-the-scenes care
- Installing the custom figurines on the rods
- Testing functionality and making adjustments
Celebration Match (15-30 min)
- Quick game of foosball with the new custom figurines
- Students experience their creations in action
- Reflection on the creative and technical journey
The physical installation and table maintenance ritual connects digital making to material care, showing students that creating includes maintaining.
Tools & Technologies
Model Acquisition
Students have multiple pathways to obtain their 3D models:
3D Scanning:
- Polycam - User-friendly photogrammetry app for mobile devices
- Scaniverse - LiDAR-based scanning app by Niantic for supported devices
Online Resources:
- Thingiverse - Large community library of 3D printable models
- Printables - Curated collection of quality 3D models
- MyMiniFactory - Community-driven 3D object repository
From Scratch:
- Students can build entirely original designs directly in TinkerCAD
Both scanning and downloading give students a starting point to modify, while building from scratch offers complete creative freedom. The important part is that every student personalizes their model, regardless of where it originated.
3D Modeling
- TinkerCAD - Browser-based, intuitive CAD software perfect for beginners. Students adapt their scans, add features, and ensure proper dimensions for the foosball table rods.
- Nomad Sculpt (optional) - For students wanting to refine organic shapes and add sculptural details to their models.
Manufacturing
- PrusaSlicer - Students learn to slice their models, configure print settings, and understand the relationship between design and manufacturability.
- 3D Printing - Hands-on experience with FDM printers, learning about support structures, layer orientation, and print quality.
- Painting & Finishing - Adding personal flair with paints and protective coatings.
Pedagogical Approach
This workshop follows the einszwovier philosophy of democratic and participatory making:
- Student Ownership - Each student creates their own unique figurine, making personal decisions throughout the process
- Iterative Learning - Mistakes become learning opportunities; failed prints lead to better understanding
- Skill Scaffolding - Starting with scanning (capturing reality), progressing to modeling (modifying reality), and finally manufacturing (materializing ideas)
- Functional Outcome - The figurines aren't just art projects—they become part of the school's play infrastructure
Second Iteration Improvements
In the second run of this workshop, we refined:
- Better time management - Clearer daily goals and streamlined scanning processes
- Template models - Starter TinkerCAD projects to help students understand scale and mounting requirements
- Printing coordination - Optimized print queues to ensure all students see their prints complete during the workshop
- Documentation - Students photograph their process and reflect on design decisions
Impact
The Kicker Glow-Up transforms abstract digital fabrication concepts into tangible, playful outcomes. Students see their school's outdoor foosball tables populated with their creations, fostering a sense of agency and connection to their learning environment. The project demonstrates that 3D printing isn't just about making things—it's about empowering young people to reshape their world.
Gallery
-
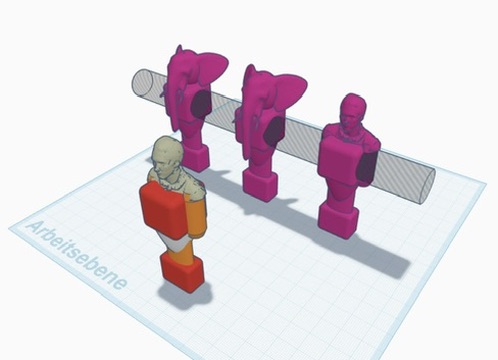
Digital design of custom foosball figurines in TinkerCAD
-

Test fitting the figurine on the foosball rod